Sarah Spenser reawakens their inner artiste with a review of our at-home lino printing kit
I know we've all become pretty laissez-faire about getting the majority of our goods online, but the thrill of receiving post that is not a bill or a circular is something that I think will always stay with me. I also have a habit that supports this thrill. Or what I really mean is I order something online and then promptly forget about it.
I ordered my Indytute At Home Lino Kit in the middle of a massive houseplant binge, which added to my initial confusion and then joy when a box arrived a few days later that didn't say 'caution: plants' on the box.
Coming from a fabulously artistic background (read: I was an enthusiast at school and uni), I felt familiar with the concept of lino printing and was in a happy cloud of satisfaction about my own artistic abilities before I'd even finished unpacking the kit.
What's in the box?
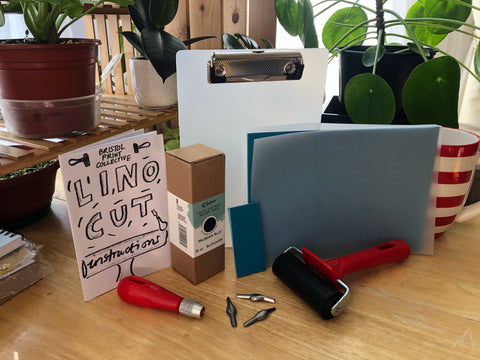
My box of treasures contained a couple of pieces of lino (one full-sized, one small for testing), a clipboard (a great idea as a lino holder while cutting) and then a surface to roll ink out on), a full-sized thing of ink (I was impressed at how much ink there was), an ink roller, a lino cutting tool with 3 different sized interchangeable blades, tracing paper (to get the picture on the lino before cutting), and a very cute printed set of instructions.
Onto the experience itself. I read through the instructions and mentally confirm that yes, I still understand the concept and how to do it. They suggest using a wooden spoon to press the paper against the lino to help with ink transfer – OK cool, I can do that, and I grab a spatula too because in my mind I'm an overachiever, and why the hell not?
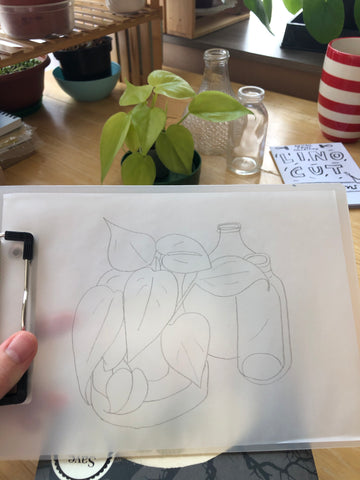
Step 1: The drawing
I lay out my tools to take some pictures, and have a random momentary sense of panic when I realise I don't have a paintbrush… Which quickly recedes when I remember that is the whole point of the roller. A little nagging sense of doubt in myself creeps into my mind, but I brush (ha!) it off and continue,
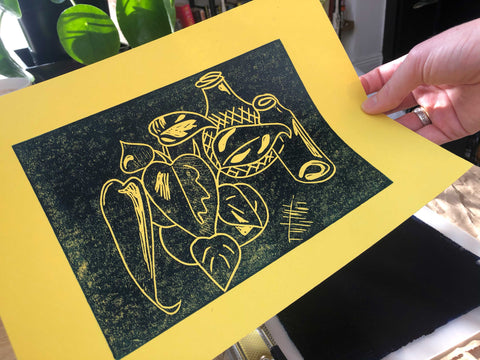
I decide to do a still life drawing as the basis for my print, one featuring my newest plant baby, a Philodendron Scandens Lemon Lime, with a couple of glass bottles in the background.
I dig out suitable drawing implements and a notepad and set to work. However, having not put pencil to paper in *cough* 'some' amount of years, it definitely takes more than one kick at the can until I have drawing I feel satisfied with.
I mean, when I *say* satisfied, I mean I just gave in and made do with a drawing when I realised I now suck at drawing.
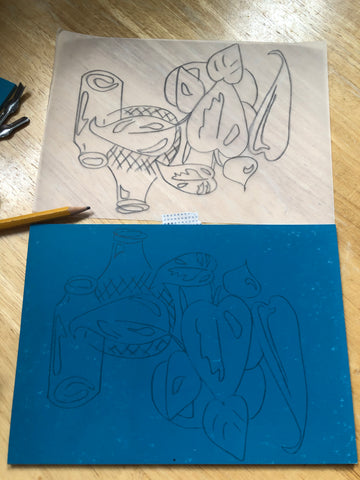
The next stage is the bit I always liked in school because it subtly changes your original drawing: you trace your drawing onto the lino. Which means in real terms, trace your drawing, flip the paper and scribble on the lines so there is graphite to transfer, lay the tracing paper on lino, redraw over your lines, and it transfers onto the lino. Then, go over the lines on the lino with a sharpie so they don't rub off while you're cutting.
Thinking myself a clever little so-and-so, I know that if you follow that procedure, you end up printing a mirror image of your drawing. So I take a picture of my still life on my phone, flip it, and draw my picture from that. This at least helps assuage my injured inner artist.
Step 2: The cutting
So I've done the transfer and I am ready to cut, and I select the middle blade as my weapon of choice and get to work. I say blades – these are very particular blades that are tiny scoops sharpened to a blade, so you literally scoop out your lines.
Remembering the warning in the instructions, I remember to always scoop/cut away from myself, making sure my hands are behind the handle at all times. (I know that sounds like a particular thing to mention but I recall a schoolmate called Rezma in GCSE art gouging a piece of her hand out with one of those things, and I have no interest in doing the same to myself.)
There is something very tangibly satisfying about cutting lino. It's the artists' equivalent of peeling an orange in one go when you do a really long strand.
Step 3: The printing
I get my image cut out quite quickly with very little issue and immediately spiral into panic as I don't have any high-quality art paper to print on.
The urge to go down to the Rymans down the road is very strong, but the guilt I would be too much – I have a huge pile of recycled parcel paper in my front hall, and a random pack of bright-yellow card I could use.
I squish a bit of ink out onto the clipboard and roll it with the roller. This sounds delightful. You only need a small amount, no more toothpaste than you'd use in one go, and roll it out until it sounds a little like sandpaper and the ink is evenly distributed.
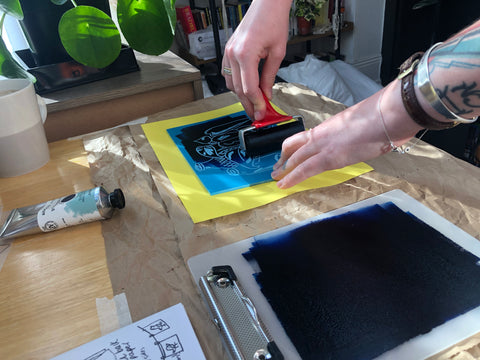
I then have a very happy session of rolling the ink off the clipboard, rolling it onto the lino, carefully placing the card on top, rubbing the back of the card with a spoon to help with even ink transfer, peeling the card off, and setting aside to dry.
Feeling confident, I then have a go at printing onto the brown parcel paper I have kept out of insistence that I will reuse it. Same process, until the room is covered in prints.
Step 4: A disaster... ?
I then make two realisations.
One – what am I actually going to do with these prints?!
Two, possibly more importantly: I hate the prints.
These are not the beautiful, quirky pieces of art I had envisaged in my mind. [ - The Indytute's note: This print is actually gorgeous!]
My mood plummets, and my housemate is utterly confused as to how I can go from happily printing in the front room, to crying over the sink as I wash the ink off the lino. It's washable, and in my head I was determined to re-cut the image into a masterpiece.
I sit in a chair and am presented with a milky coffee and a pep talk which I don't fully take in as I'm wallowing in misery. The main take-away is that it's ok to not like the prints, but I am still a creative person and this hiccup doesn't mean I'm not. *sniffs*
Feeling soothed, I turn my attention to the lino set up…. and realise I can use the other side and start afresh.
This perks me up immediately, and I resolve to do something simple and with a message. Literally a message. I'm going to do a text-based pep talk.
Step 5: The happy resolution
Remembering what I mentioned above about printing reflections, I take care to make sure I get the text the correct way around, and get cracking.
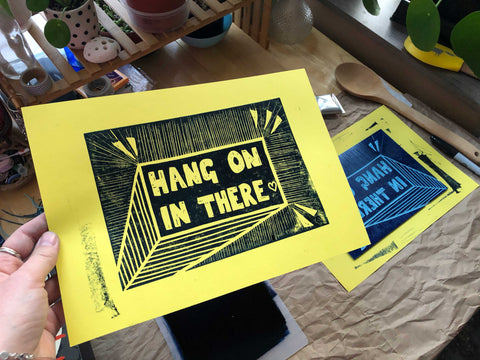
I go through it all (drawing, tracing, drawing, cutting, rolling, printing) and double the amount of prints spread around the room to dry. As I sit surveying my inky blue domain, I pick up the instructions again to admire the illustrations – and realise I completely missed the fact they have a watch-along video tutorial. Whoops. Next time, gadget.
FURTHER READING: For another first-hand account of one of our experiences, ready about this quirky gin safari around Bermondsey
All images: Sarah Spenser